Anniversary Printable SNEAK PEEK
This FREE Printable Party Set is Coming Soon!
|
|
We have a get-together with our church small group coming up and the hostess wanted to make the get-together special for another couple who was having their anniversary that day. So, I offered to bring some Happy Anniversary printables to the party. I was sure I had pinned one somewhere! Wrong! I searched the web and nada. So, I decided to create a Happy Anniversary Party Printable Set myself!
|
|
|
This is how the banner turned out. It is a blue and white chevron pattern with yellow letters and grey accents.
|
|
|
Maybe a nod to the nautical theme I'm crazy for right now?
|
|
|
I created one page of smaller tags and toppers with Bible verse phrases on love and other love phrases.
|
|
|
This is what the entire set looks like.
|
|
|
Close-up of the "Y" on the banner.
|
|
|
Close-up of the Tags and Toppers.
|
I will be giving you this Anniversary Party Printable Set for FREE soon!
Keep checking my blog and Facebook Page for the latest posts!
It's Easter!
Ok, I realize Easter has come and gone, but I never had time to post all of my Easter decorating ideas! So here goes...
|
|
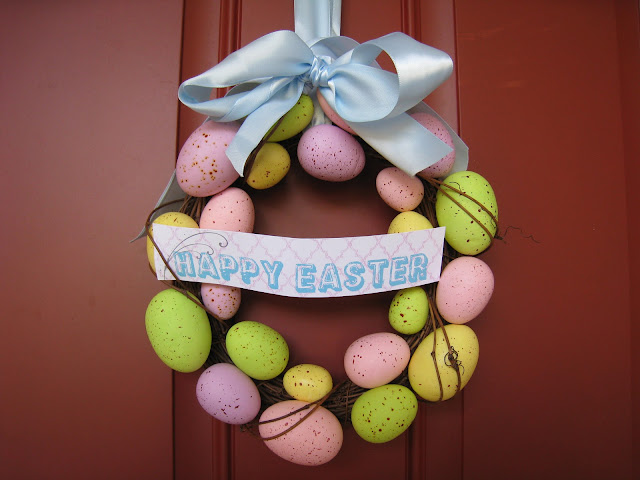
I bought this wreath for $2.50 at Target in the Dollar section. I simply added the blue ribbon and the words HAPPY EASTER from the Easter Party Printable I created. |
|
|
This is my Easter table setting before I added the plates etc. It's simple and very inexpensive! I purchased 2 white plastic tablecloths (my table is super long), one roll of wrapping paper, one pack of 24 paper doilies, 2 packs of faux moss covered rocks, and brown paper Easter basket filling from the Dollar Tree all for $1 each totaling $7! I made the DIY Candy Display Jars and you can see how in the post on my blog. I purchased the green basket from Target in the Dollar section also-I think it cost $2.50 and added the brown paper Easter basket filling with eggs I had purchased from Dollar Tree last year. I created the free Easter Party Printables that you can use also! |
|
|
Notice how the doily runner falls off the end of the table?
|
|
|
Another view of the table.
|
|
|
The table is set and ready to go!
|
|
|
Hope you had a Happy Easter!
|
Easter Silhouettes
|
|
This project was so easy thanks to Martha Stewart! I had some scrapbook paper that I measured and cut down to 8.5 X 11 inches (regular paper size). The paper has two different patterns on both sides. I printed the design on the side I did not want to display-the "wrong" side. The silhouette comes from the Martha Stewart website. |
|
|
Then, I cut out the silhouettes (which include chicks, a rooster, and a bunny) with scissors and taped them to wooden sticks. Next, I inserted them into my woven wreath (another Dollar Tree find) so they would be standing upright.
|
|
And finished! My mantle is ready for Easter! The Easter Banner comes from the free Easter Party Printable Set I created!
|

|
DIY Easter Paper Napkin Rings
|
|
Then, I folded the circle in two trying not to create creases and cut a slit with my scissors.
|
|
|
|
|
Lastly, I slid a rolled up napkin through the middle creating a simple napkin ring! So Easy, Cute, and Inexpensive!
|
DIY Easter Placecards & Candy Egg Holders
|
|
This Easter printable came from The Hostess with the Mostess Blog. I printed out the placecards and affixed labels with my guests names on them. Then, I taped it together creating a loop around my finger and added my mini cadbury eggs on top for each guest. |

| Thanksgiving at my house. With so many guests coming, I bought fancier plastic plates at BJ's Wholesale Club along with the silverware for easier clean-up. Everyone thought it was the real thing until they picked it up and realized how light it was! |
 |
| Christmas at my house! My favorite holiday! Tip: Repetition is key in table settings to make it look beautiful! |
 |
| Close-up of Christmas table setting. Tip: Try not to let your table setting impede conversation. If your vases or decor are tall, put them in between guests. Less is better with most larger pieces. |


